Lab Environment: Infrastructure as Code with Vagrant, Ansible, and VirtualBox
A step-by-step guide on creating a consistent, reproducible lab environment using Vagrant, VirtualBox, and Ansible, focused on automating infrastructure setup through code.

Introduction
As I started exploring the world of DevOps, I quickly realized the importance of a consistent, reproducible environment. Whether it was developing software, testing configurations, or learning new technologies, the ability to spin up and tear down environments quickly and efficiently is a powerful skill.
Enter Infrastructure as Code (IaC), the key to mastering environment consistency.
In this lab, I’ll walk through setting up a development environment using Vagrant, Ansible, and VirtualBox. This setup will include a control node and multiple worker nodes, all configured through code.
Let’s dive in!
Prerequisites
Before I begin, I made sure to have the following installed on my local machine:
- Vagrant: Download and Install Vagrant, in my case:
1
sudo apt update && sudo apt install vagrant
- VirtualBox: Download and Install VirtualBox, in my case:
1
sudo apt update && sudo apt install virtualbox
Vagrant Setup
Step 1: Setting Up My Project Directory
First, I created a project directory and navigated into it:
1
mkdir lab-env/vagrant && cd lab-env/vagrant
Inside this vagrant directory, I created a Vagrantfile to define the configuration of my virtual machines.
Step 2: Writing My Vagrantfile
The Vagrantfile is the heart of this setup. It defines the configuration of my VMs, including the number of machines, their resources, and how they are provisioned.
Here’s an example Vagrantfile that I used to set up three VMs:
1
2
3
4
5
6
7
8
9
10
11
12
13
14
15
16
17
18
19
20
21
22
23
24
25
26
27
28
29
30
31
32
33
34
35
36
37
Vagrant.configure("2") do |config|
    servers=[
        {
          :hostname => "control",
          :box => "bento/ubuntu-22.04",
          :ip => "172.16.1.50",
          :ssh_port => 2200
        },
        {
          :hostname => "node1",
          :box => "bento/ubuntu-22.04",
          :ip => "172.16.1.51",
          :ssh_port => 2201
        },
        {
          :hostname => "node2",
          :box => "bento/ubuntu-22.04",
          :ip => "172.16.1.52",
          :ssh_port => 2202
        }
      ]

    servers.each do |machine|
        config.vm.define machine[:hostname] do |node|
            node.vm.box = machine[:box]
            node.vm.hostname = machine[:hostname]
            node.vm.network :private_network, ip: machine[:ip]
            node.vm.network "forwarded_port", guest: 22, host: machine[:ssh_port], id: "ssh"
            node.vm.provider "virtualbox" do |vb|
                vb.gui = false #Disable GUI to save resources
                vb.linked_clone = true
                vb.memory = 1024
                vb.cpus = 2
            end
        end
    end
end
Explanation:
serversarray: I used this to define my control node and two worker nodesbox: This specifies the base image for the VMs. I chosebento/ubuntu-22.04private_network: Assigns a static IP to each VMforwarded_port: Forwards the SSH port from each VM to a specific port on my host machineproviderblock: Configures VirtualBox settings like memory and CPU allocation
Step 3: Running the Environment
Make sure to run command in the directory where the
Vagrantfileis located.
After configuring the Vagrantfile, I brought up the environment using:
1
vagrant up
A long set of logs will show up, we can also see the VMs status using:
1
vagrant status
Result
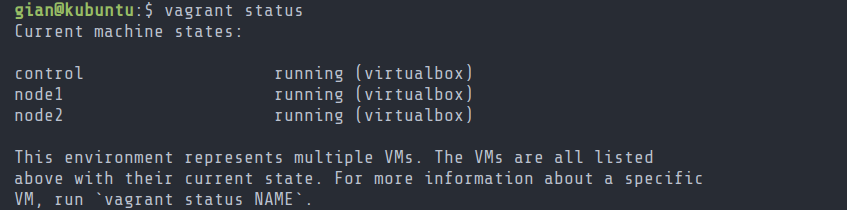 Screenshot of vagrant status command
Step 4: Accessing the VMs
Once the VMs were up and running, I could SSH into them using:
1
2
3
vagrant ssh control
vagrant ssh node1
vagrant ssh node2
Step 5: Testing VM inter-communication
Using the vagrant ssh control command, I accessed the control machine. I decided to test communication between the machines by pinging them.
To facilitate things, I copied the following hosts file to /etc/hosts
1
2
3
4
5
6
7
8
9
10
11
127.0.0.1 localhost
127.0.1.1 vagrant.vm vagrant

# The following lines are desirable for IPv6 capable hosts
::1 localhost ip6-localhost ip6-loopback
ff02::1 ip6-allnodes
ff02::2 ip6-allrouters

172.16.1.50 control
172.16.1.51 node1
172.16.1.52 node2
By default, Vagrant will share the project directory (the directory with the Vagrantfile on host) to /vagrant (on guest machine). \
Inside the control machine, I ran the following command:
1
sudo cp /vagrant/hosts /etc/hosts
I pinged both node1 and node2 using the following:
1
ping -c 3 node1 ; ping -c 3 node2
The -c (count) flag allows me to stop pinging after 3 replies
Result
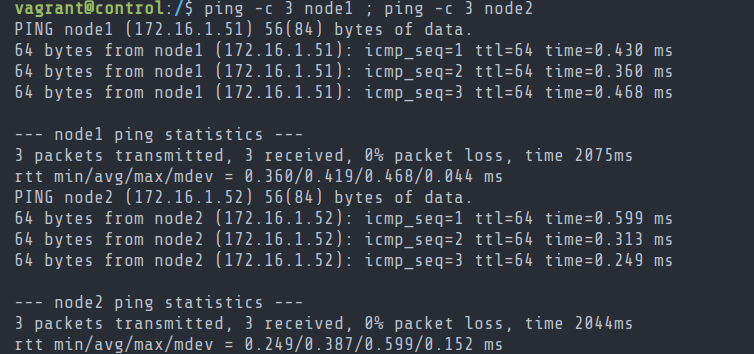 Screenshot of ping command from control to nodes
Step 6: Enabling SSH connectivity
From the control machine, we’ll ssh into node1 using the following:
1
ssh vagrant@node1
Result
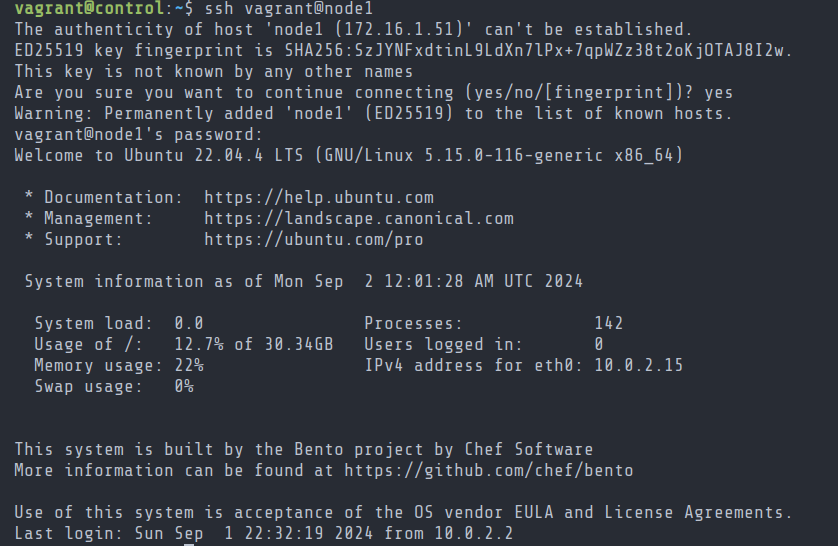 Screenshot of ssh command from control to node1
The result is the same when connecting to node2 via ssh
To avoid being prompted for a password and facilitate the use of Ansible, I’ll create an ssh key pair.
Creating SSH Key Pair
When prompted for a passphrase, press enter to set none.
From the control machine, we’ll run:
1
ssh-keygen
The ssh keys (id_rsa & id_rsa.pub) should be saved at /home/vagrant/.ssh/
Now, I can copy the SSH Keys to the nodes by running:
1
ssh-copy-id node1 && ssh-copy-id node2
I’m prompted for a password, by default it should be vagrant
Lastly, I’ll test the passwordless SSH login:
1
ssh vagrant@node1
Result
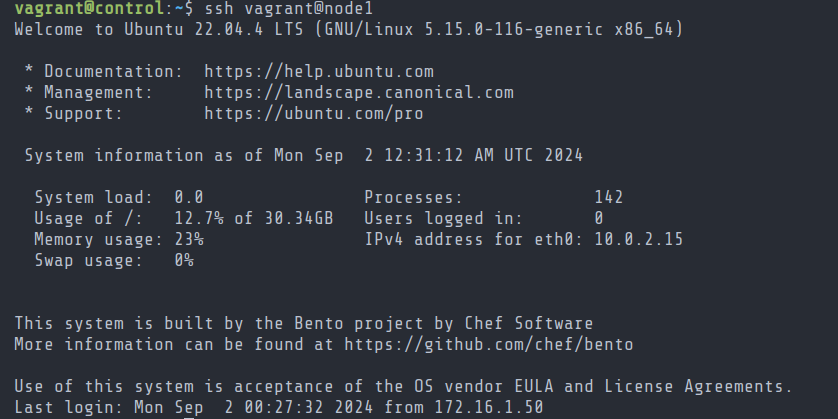 Screenshot of ssh command after copying keys to nodes
Bam! Passwordless login :)
It’s time for Ansible !
Ansible Setup
Step 1: Installing Ansible on Control Machine
Make sure to ssh into control machine first.
Before configuring Ansible, I’ll install it on the control machine by running:
1
sudo apt install ansible -y
I verified the ansible version by running:
1
ansible --version
Now, I can setup the inventory file and playbook file.
Step 2: Setting Up Inventory File
On my host machine, inside the /lab-env/vagrant/ directory, I’ll create a directory for ansible and navigate into it:
1
mkdir ansible && cd ansible
I then created the following inventory file labhosts:
1
2
3
4
5
6
7
control:
  hosts:
    control:
nodes:
  hosts:
    node1:
    node2:
This inventory file defines the machines in my lab environment, organized into groups for easy management. The control group contains the control machine, while the nodes group includes node1 and node2.
This setup allows me to target specific machines or groups for automation tasks, streamlining the management of my lab environment
Step 3: Setting Up Playbook
On my host machine, inside /lab-env/vagrant/ansible/, I’ll create the following playbook.yml:
1
2
3
4
5
6
7
8
9
10
11
12
13
14
15
16
17
18
19
20
21
22
23
24
25
26
27
28
29
30
31
32
---
- name: Set Up Lab Environment
  hosts: nodes
  become: true
  tasks:
    - name: Ensure docker is installed
      apt:
        name:
          - docker.io
        state: latest

    - name: Ensure docker compose is installed
      apt:
        name:
          - docker-compose
        state: latest

    - name: Ensure docker group exists
      ansible.builtin.group:
        name: docker
        state: present

    - name: Reset SSH connection to allow group to be picked up
      ansible.builtin.meta: reset_connection

    - name: Add user to docker group
      ansible.builtin.user:
        name: vagrant
        groups: docker
        state: present
        append: yes
      become: true
Step 4: Running Playbook
I proceeded to ssh into the control machine, navigated it to /vagrant/ansible/ and ran the following:
1
ansible-playbook -i labhosts -K playbook.yml
Result
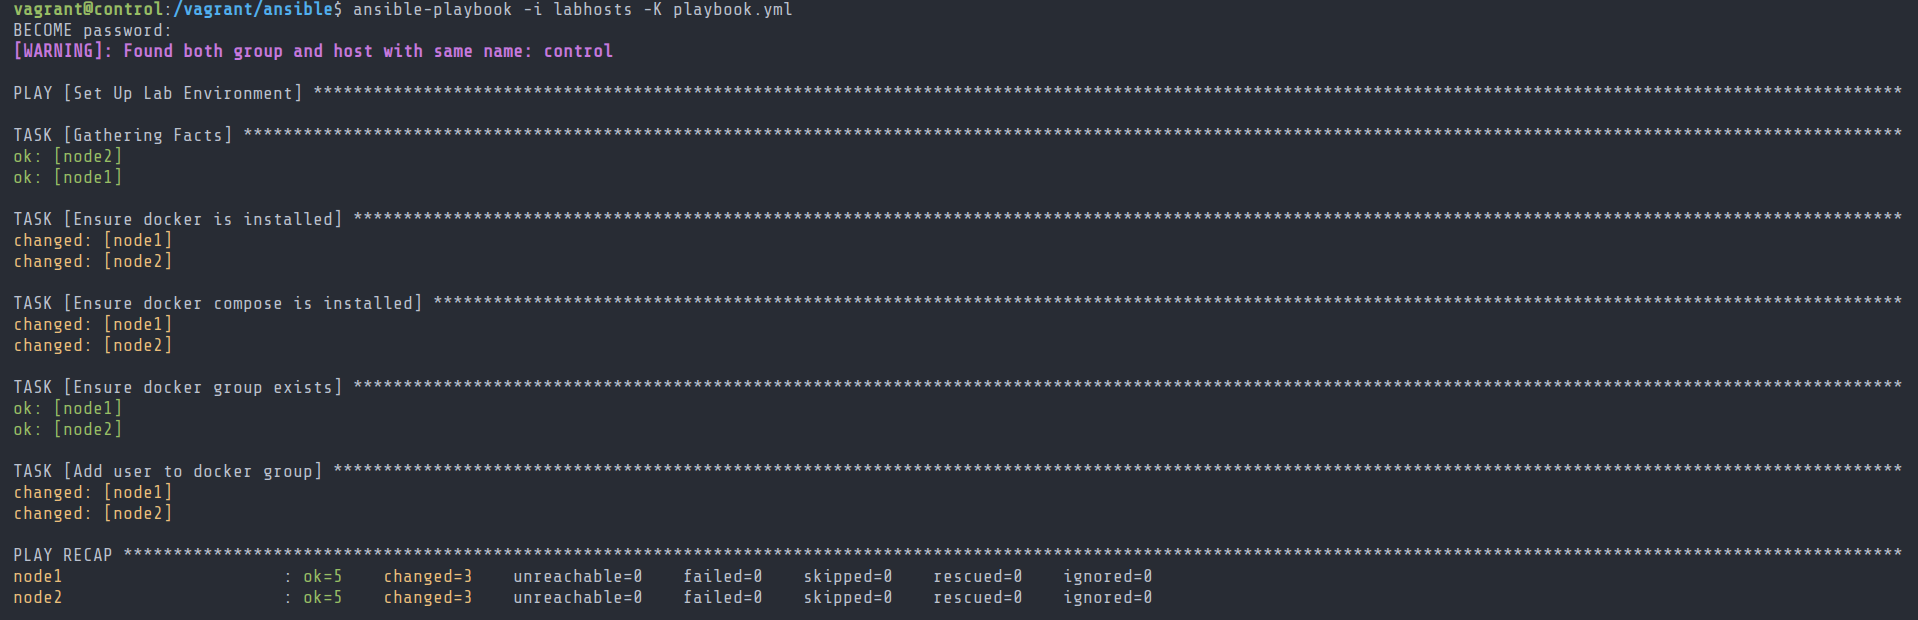 Screenshot of playbook result
The playbook ran successfully!
Step 5: Verifying Changes
From the control machine, I ssh into node1:
1
ssh node1
Then verified the docker installation as well as the user groups using the following:
1
docker --version && id
Result
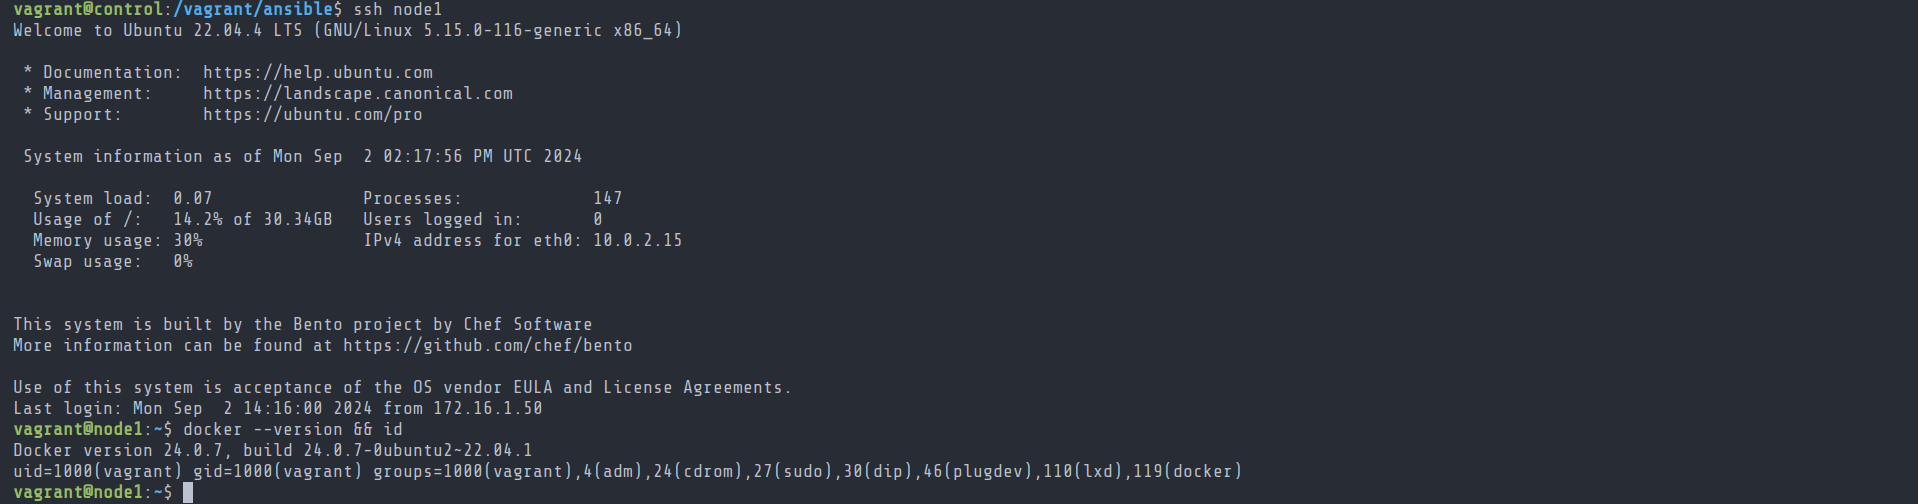 Screenshot of vagrant user groups and docker version
Summary and Next Steps
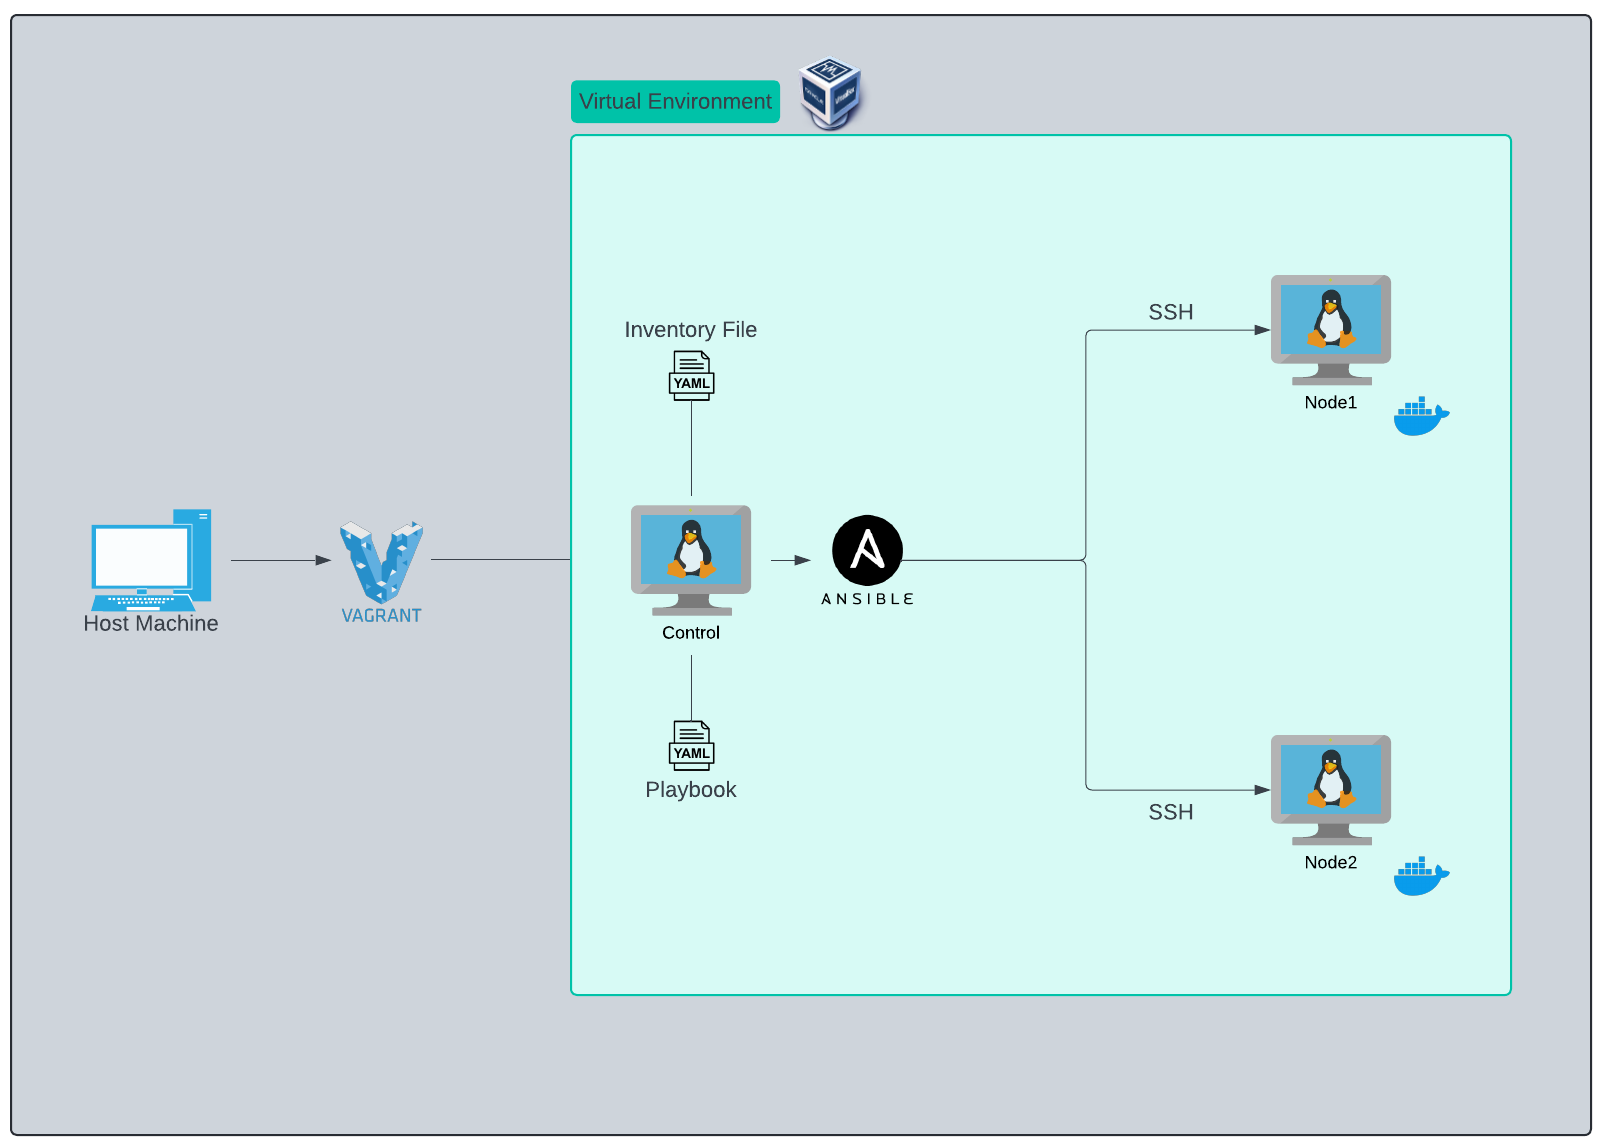 Diagram of Lab Environment
In this guide, I’ve successfully set up a lab environment using Vagrant and VirtualBox, automating the installation of Docker and Docker Compose with Ansible, as well as managing the nodes’ users and roles. The process highlights how automation can simplify complex tasks and ensure consistency across multiple nodes.
Looking ahead, I plan to experiment with either Kubernetes or Docker Swarm to explore multi-host container orchestration and management. This will build on the foundations laid in this project, moving towards more advanced, scalable solutions.
For those interested in exploring this setup further, all files used in this project are available in my project repository. Feel free to clone the repo, experiment with the configurations, and adapt them to your own needs!